


Introduction
OpenNode is a bitcoin payment processor that makes it easy for you to accept bitcoin payments. By integrating OpenNode into your app, your users can make payments in bitcoin. You can also receive the payout in bitcoin or local currencies like EUR, GBP, USD and more.
This guide demonstrates how to integrate OpenNode into your application using PHP. Well, you don't have to use PHP.
Prerequisite
Before you complete this tutorial, you should have the following:
You have an OpenNode account with API keys for development. You can signup at dev.opennode.com to create an API key. Select "read" as permission.
This article is framework agnostic. You only need to have Composer installed on your machine. If you are not familiar with Composer, you can get grounded by reading Getting Started with Composer by Jad.
Once you have all the above, you can begin the steps outlined in this guide.
Step 1: Install OpenNode PHP library
Create a new project or navigate into an existing project and run the following command:
composer require opennode/opennode-php
This will install the OpenNode PHP package into your project. With this package installed you can connect to OpenNode endpoints without writing coding code for each endpoint.
Step 2: Creating a charge
Creating a charge is required to recieve bitcoin payment through OpenNode. A charge contains an invoice that makes it capable of accepting Bitcoin payments either via Lightning Network or On-chain.
Create a new file or route on your app, and enter the following code:
use OpenNode\OpenNode;

\OpenNode\OpenNode::config(array(
    'environment'               => 'dev', // dev OR live
    'auth_token'                => 'PASTE YOUR AUTH TOKEN HERE',
    'curlopt_ssl_verifypeer'    => TRUE // default is false
));
The code above simply set up your OpenNode authentication. OpenNode has two separate environments for developers to work in, Development and Production. It is important you use the dev environment until you are sure everything works perfectly.
Replace the text 'PASTE YOUR AUTH TOKEN' with your OpenNode dev token.
Next to the code above, add the following code below:
$charge_params = array(
    'amount'            => 10.00,
    'currency'          => 'USD',
    'callback_url'      => 'https://yourapp.com/hooks/opennode', // Optional
    'success_url'       => 'https://yourapp.com/order/213/success', // Optional
    'order_id'          => 'id=13237&name=jeremy&wallet=btc',
    'auto_settle'       => false //Optional
);

try {
  $charge = \OpenNode\Merchant\Charge::create($charge_params);

  echo 'LN BOLT11: ' . $charge->lightning_invoice["payreq"].PHP_EOL;
  echo 'BTC address: ' . $charge->chain_invoice['address'];

  print_r($charge);

} catch (Exception $e) {
  echo $e->getMessage(); // InvalidRequest Error creating order
}
Try running the code. Your result should be similar to the screen below:
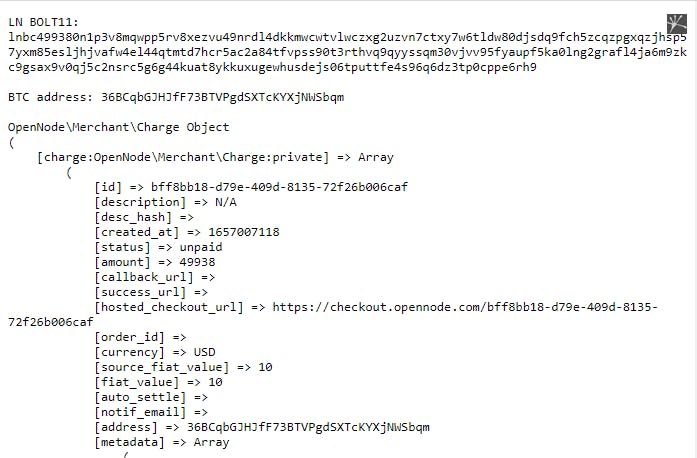
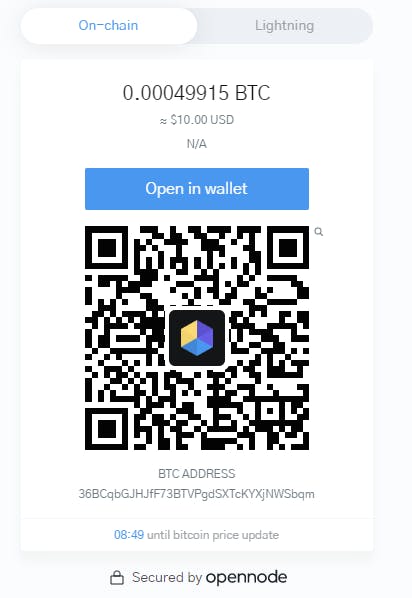
Great! You successfully created a charge. A charge contained both the lightning and on-chain address. The charge also include a hosted_checkout_url. You navigate the user to this URL to make a payment.
If you need bitcoin for testing, use HTLC bitcoin faucets; only for testing.
Next, you need to know when a user has paid so you can offer them value or send them a custom receipt.
Step 3: Capture webhook notification
OpenNode trigger an event payload when the status of the charge you created has changed.
There are three type of charge status: paid, unpaid, underpaid. In most scenarios, the paid status is what you want your app to listen to.
But to capture this event, first, you have to inform OpenNode where to send the payload for each charge. This you can do at the creation of a charge ( step 2).
$charge_params = array(
       'callback_url'      => 'https://yourapp.com/hooks/opennode', // Optional
);

...
Noticed the callback_url. This should be a full link to a file or route on your app. OpenNode will send an event payload to that URL when there is a change in the status of the transaction.
To see what this data look like for testing purposes, you can use webhook.site.
POST callback_url | application/x-www-form-urlencoded
{
    id: id,
    callback_url: callback_url,
    success_url: success_url,
    status: status,
    order_id: order_id,
    description: description,
    price: price,
    fee: fee,
    auto_settle: auto_settle,
    hashed_order: hashed_order
}
Secondly, you to need securely handle this webhook data. Add the following code to the callback file or route you created within your application:
$charge = $_POST;

if ( empty($charge) || !is_array($charge) ) {
    exit("charge error");
}

$apiKey      = "OPENNODE-TOKEN";
$recieved    = $charge["hashed_order"];
$calculated  = hash_hmac( "sha256", $charge["id"], $apiKey );

if ( !hash_equals( $calculated, $recieved) ) {
    exit("failed");
}

print_r( $charge ); // print the charge data
OpenNode signs all charge related events it sends to your callback URL with a hashed_order field on the event payload. This allows you to validate that the events were sent by OpenNode and not by a third party.
To validate, you verify the signatures by computing an HMAC with the SHA256 hash function. This is very easy in PHP. Just use the hash_hmac function:
$apiKey      = "YOUR OPENNODE API KEY";
$recieved    = $charge["hashed_order"];
$calculated  = hash_hmac("sha256", $charge["id"], $apiKey);
The hash_hmac function requires three parameters; the hash algorithm, the data or message, and the key.
- the hash algorithm is sha256
- the hash data or message is the hashed_order field in the webhook payload
- the key is your OpenNode API key.
We then check if the calculated hash matches the hashed_order in the event payload.
if ( !hash_equals( $calculated, $recieved) ) {
    exit("failed");
}
This way you ensure no third-party request will pass through successfully. You can then proceed below this line by checking if the transaction status is paid or otherwise before giving value to the user.
Step 4: Passing custom data
In most cases, you will need to pass along unique data in each payment. You can do that by passing along a parameter order_id; it has to be a string.
$charge_params = array(
       "order_id"   => "id=13237&name=jeremy&wallet=btc",
        ...
);
This data will also be sent along with the event payload (we discussed in step 3). You can then slice out this string into an array using parse_str().
The order_id you passed doesn't have to look like the one above. You may encrypt your data as a string; Do whatever you feel is best for you.
Step 5: Handling Success
Since you are redirecting the user to OpenNode hosted checkout, you want to ensure the user returned back to your app.
Similar to callback_url, you can pass a success_url when creating a charge:
$charge_params = array(
       'success_url'       => 'https://yourapp.com/order/213/success', // Optional
);
...
If there is no success_url, the user will have to manually return back to your application.
With the above steps, you can fully integrate OpenNode in any PHP application.
Conclusion
OpenNode is a great way to accept Bitcoin payments on your application. There are no limits as to what you can do when it comes to accepting bitcoin. The OpenNode APIs have everything you need. You can decide to build your own custom Bitcoin checkout so your user don't have to redirect to OpenNode. The choice is yours.
Resource
- OpenNode Postman collections. Download the JSON and import it into Postman for testing.
- OpenNode PHP Library