How to Integrate OpenNode PT 1

Supporting engineers building for the next billion users.
Hey, welcome, in this post I will be sharing how to integrate OpenNode. This article has a second part. In this, you will learn how to create and handle a charge.
OpenNode is a platform that allows you to accept Bitcoin payments on your website and application. By integrating OpenNode customers can pay you Bitcoin in your application. OpenNode has multiple API endpoints you can just plugin with any programming language.
Whether it's an eCommerce site or a transfer app, you can accept Bitcoin on the Lightning network and also on-chain.
Requirements
The first thing is to create a testnet account on OpenNode, this account will be used for testing purposes. Once you create an account, create your integration keys.
Next is to download the Postman collections. Then fork it. The collection has a global authorization method, simply replace the value with your API key. The Postman collection is categorized into two folders charge and transfer. Each folder contains related endpoints.
Once you have that, let's begin by creating a charge.
Creating a charge
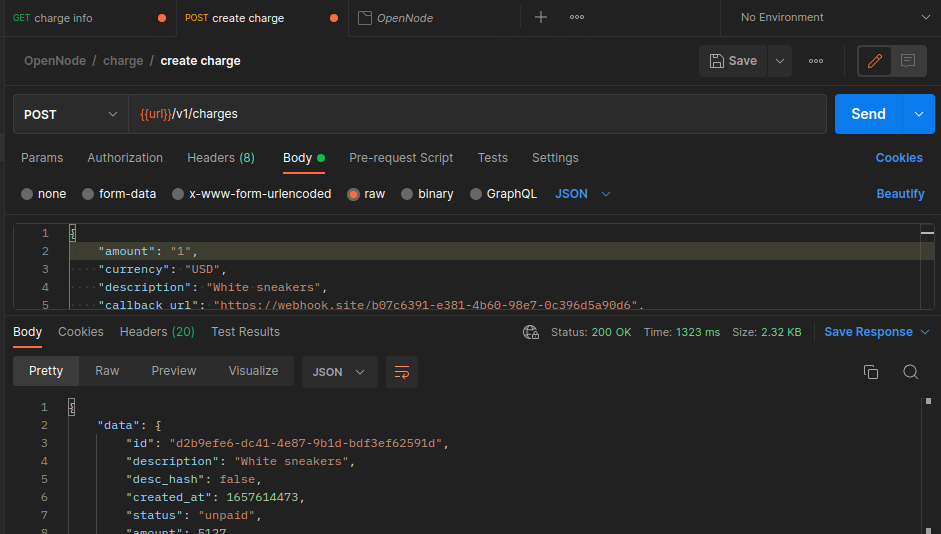
The first thing you have to do to accept Bitcoin payments through OpenNode is to create a charge. On the charge folder, open up the create charge request and run it. This will return an invoice in JSON.
You have successfully created a charge. But before we proceed to make payment, it is important you understand the request.
Here we are making a POST request to the charge endpoint with the following body params in JSON:
{
    "amount": "1",
    "currency": "USD",
    "description": "White sneakers",
    "callback_url": "https://webhook.site/b07c6391-e381-4b60-98e7-0c396d5a90d6",
    "success_url": "https://example.com/order/success?order=112",
    "order_id": "order=112&title=sneakers-white&user=111",
    "customer_email": "johndoe@mail.com",
    "name": "John Doe",
    "notif_email": "johndoe@mail.com",
    "auto_settle": false
}
Not all params are required, but I think in most cases you may want to include all. It just depends on your case.
The amount param is the only one required. Try removing all other params and run with just the amount, and you will get a successful response.
The callback_url is a URL usually within your application or a webhook service where OpenNode will send a notification each time the status of a transaction has changed. It is an important param to include when creating a charge especially if you are building a web app and you want to automatically give value to a particular user once they make payments.
The success_url is also another important data you want to include. A user will be redirected to this URL once their payment is successful. This is usually a link back to your application.
The order_id is where you include some unique information about the transactions e.g the user id or a URL encoded string of multiple data. As you can see from the Postman collection, I encoded unique information about a charge, which I can use to identify a user who made the charge and the product they are paying for.
{
    ...
    "order_id": "order=112&title=sneakers-white&user=111",
    ...
}
Other request data, though not required, are important depending on your case. For example, the currency in this request is USD, and the amount is 1, which means we want to the user to pay 1 USD in Bitcoin. If I want to charge in Indian rupees, I just use INR.
Charge response
Let's talk about the response that was returned.
{
    "data": {
        "id": "9a4de8cd-b4ae-427f-a6da-d31ad677e9b2",
        "description": "White sneakers",
        "desc_hash": false,
        "created_at": 1657615350,
        "status": "unpaid",
        "amount": 5115,
        "callback_url": "https://webhook.site/b07c6391-e381-4b60-98e7-0c396d5a90d6",
        "success_url": "https://example.com/order/success?order=112",
        "hosted_checkout_url": "https://dev-checkout.opennode.com/9a4de8cd-b4ae-427f-a6da-d31ad677e9b2",
        "order_id": "order=112&title=sneakers-white&user=111",
        "currency": "USD",
        "source_fiat_value": 1,
        "fiat_value": 1,
        "auto_settle": false,
        "notif_email": "johndoe@mail.com",
        "address": "2N1YN1TpYnhVAUL3gNThA4kgnyEgBRhiHKc",
        "metadata": {
            "name": "John Doe",
            "email": "johndoe@mail.com"
        },
        "chain_invoice": {
            "address": "2N1YN1TpYnhVAUL3gNThA4kgnyEgBRhiHKc"
        },
        "uri": "bitcoin:2N1YN1TpYnhVAUL3gNThA4kgnyEgBRhiHKc?amount=0.00005115&label=White+sneakers&lightning=lntb51150n1p3v6vl4pp5ae9jk7utl97q4lanw4pp93mmr7n7laq469nn6th5h967nxmrj64qdqh2a5xjar9ypekuetpddjhyuccqzpgxqzjhsp56y7lkwyfjazn446xlz3nuwaq3d3f65zr7g9q6363nq6fkmhj7ymq9qyyssq7sme63sswg9p2nv2wak4cwexvqaursa9kl3jkej3drsw7kh8200jhn2crvn3s9g45uwxelecmpw6qvgfvzw5anp8jqrekq20cvcsdyqpn88kru",
        "ttl": 1440,
        "lightning_invoice": {
            "expires_at": 1657615948,
            "payreq": "lntb51150n1p3v6vl4pp5ae9jk7utl97q4lanw4pp93mmr7n7laq469nn6th5h967nxmrj64qdqh2a5xjar9ypekuetpddjhyuccqzpgxqzjhsp56y7lkwyfjazn446xlz3nuwaq3d3f65zr7g9q6363nq6fkmhj7ymq9qyyssq7sme63sswg9p2nv2wak4cwexvqaursa9kl3jkej3drsw7kh8200jhn2crvn3s9g45uwxelecmpw6qvgfvzw5anp8jqrekq20cvcsdyqpn88kru"
        }
    }
}
The most important data is the id and hosted_checkout_url. You redirect the user hosted_checkout_url to make payment. You also want to save the id into your own local ledger for for future verification.
If you want to fully control the checkout flow with your own design, you can. You display the chain_invoice or lightning_invoice to a user. There is also a uri for QR code in case you want to display QR Code in your custom checkout. But make sure you understand the basics of Bitcoin LN and on-chain.
Copy or visit the hosted_checkout_url in a new tab and let's try to make a payment.
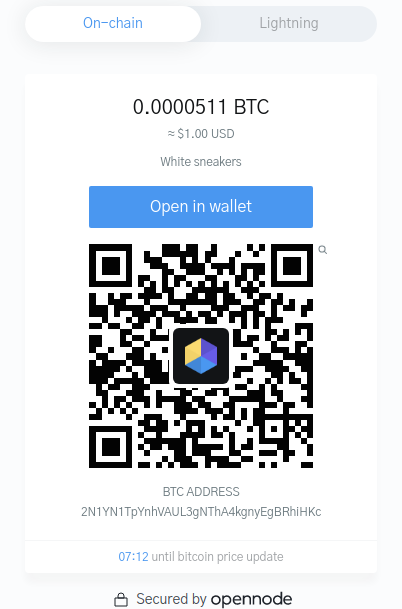
Now since we are on dev mode we don't need to use real Bitcoin. Testnet coins are what we need. I created an article if you ever need testnet coins for your applications. Here is one I use for Lightning payments HTLC.me. All you have to do is to set up an account and you will get $65 worth of tBTC. Don't get excited, you can't use it to buy pizza.
So, now I will copy the lightning payment information and paste it into HTLC.me, this will display the payment description, a good reason you want to include a description when creating a charge. Your users will see what they are paying for.
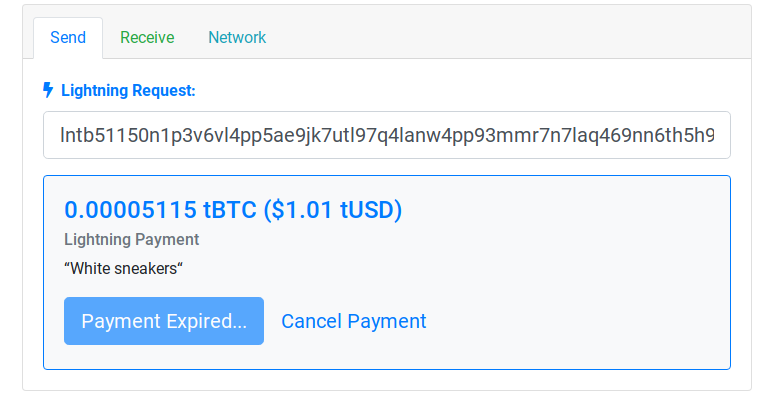
Click Send. And wait for a few seconds. OpenNode will recieve the payments and redirect us to the success_url.
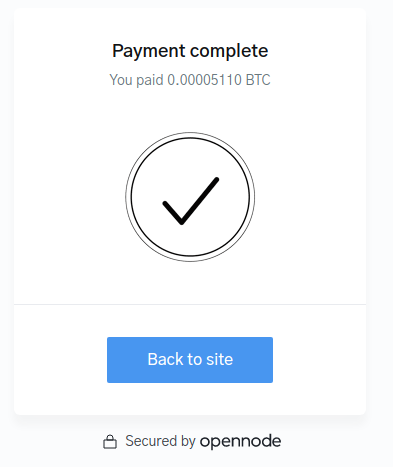
Boom! You are done.
You can open your OpenNode dashboard and you will see the Bitcoin you just received.
Handling charge webhook
Recall there is a callback_url in the charge request body.
Now, since the status of the charge has changed to paid, OpenNode has sent a Payload to the callback_url. You can see this Payload:
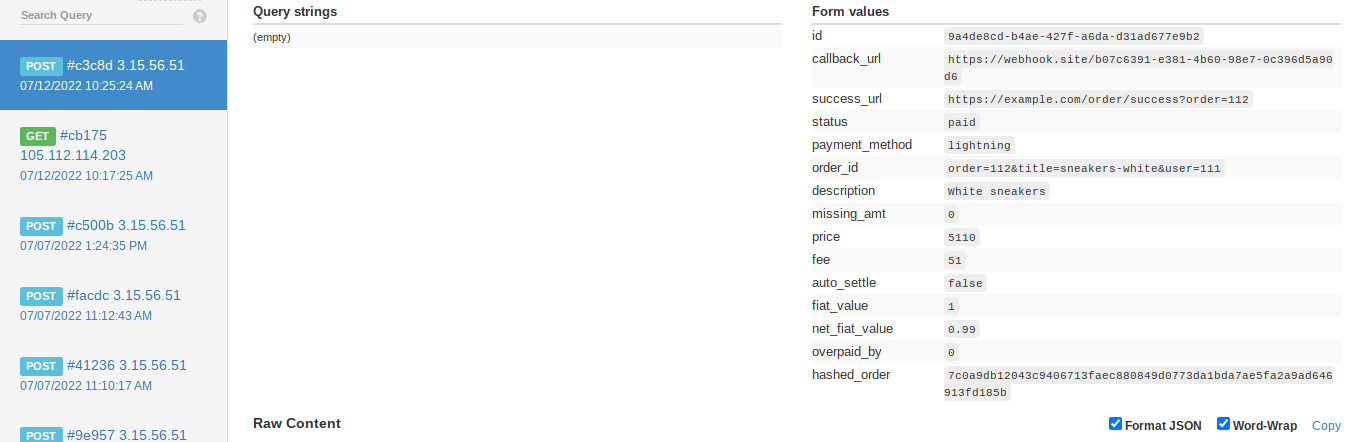
I used webhook.is for demostration purpose. There is also an example Payload on the Postman collection. You can handle this Payload using PHP, NodeJs or your favourite server-side language.
Get charge info
Webhook is good for what it is, but don't rely 100% on it. Service may be down.
You can set up a Cron job that automatically re-querys OpenNode to get info about a particular charge.
Open the charge info request, in the URL, and replace the :id with the id of the previous transaction we just created and sent. This will return info about the charge.
You will notice the status, it is the same as on the webhook.
Conclusion
By now you should know how to accept Bitcoin through OpenNode. In part II of this post, you will see how to make a Bitcoin withdrawal via OpenNode.
Love this content. Kindly share.


